A project consists of a set of observations collected in sample units (transect/quadrat/etc.) surveyed at particular sites, on particular dates, associated with management regimes. All data, data sharing, and user access in MERMAID is organized by project. It is up to you to decide how to organize your observations; many users define a project as containing the data from a single expedition.
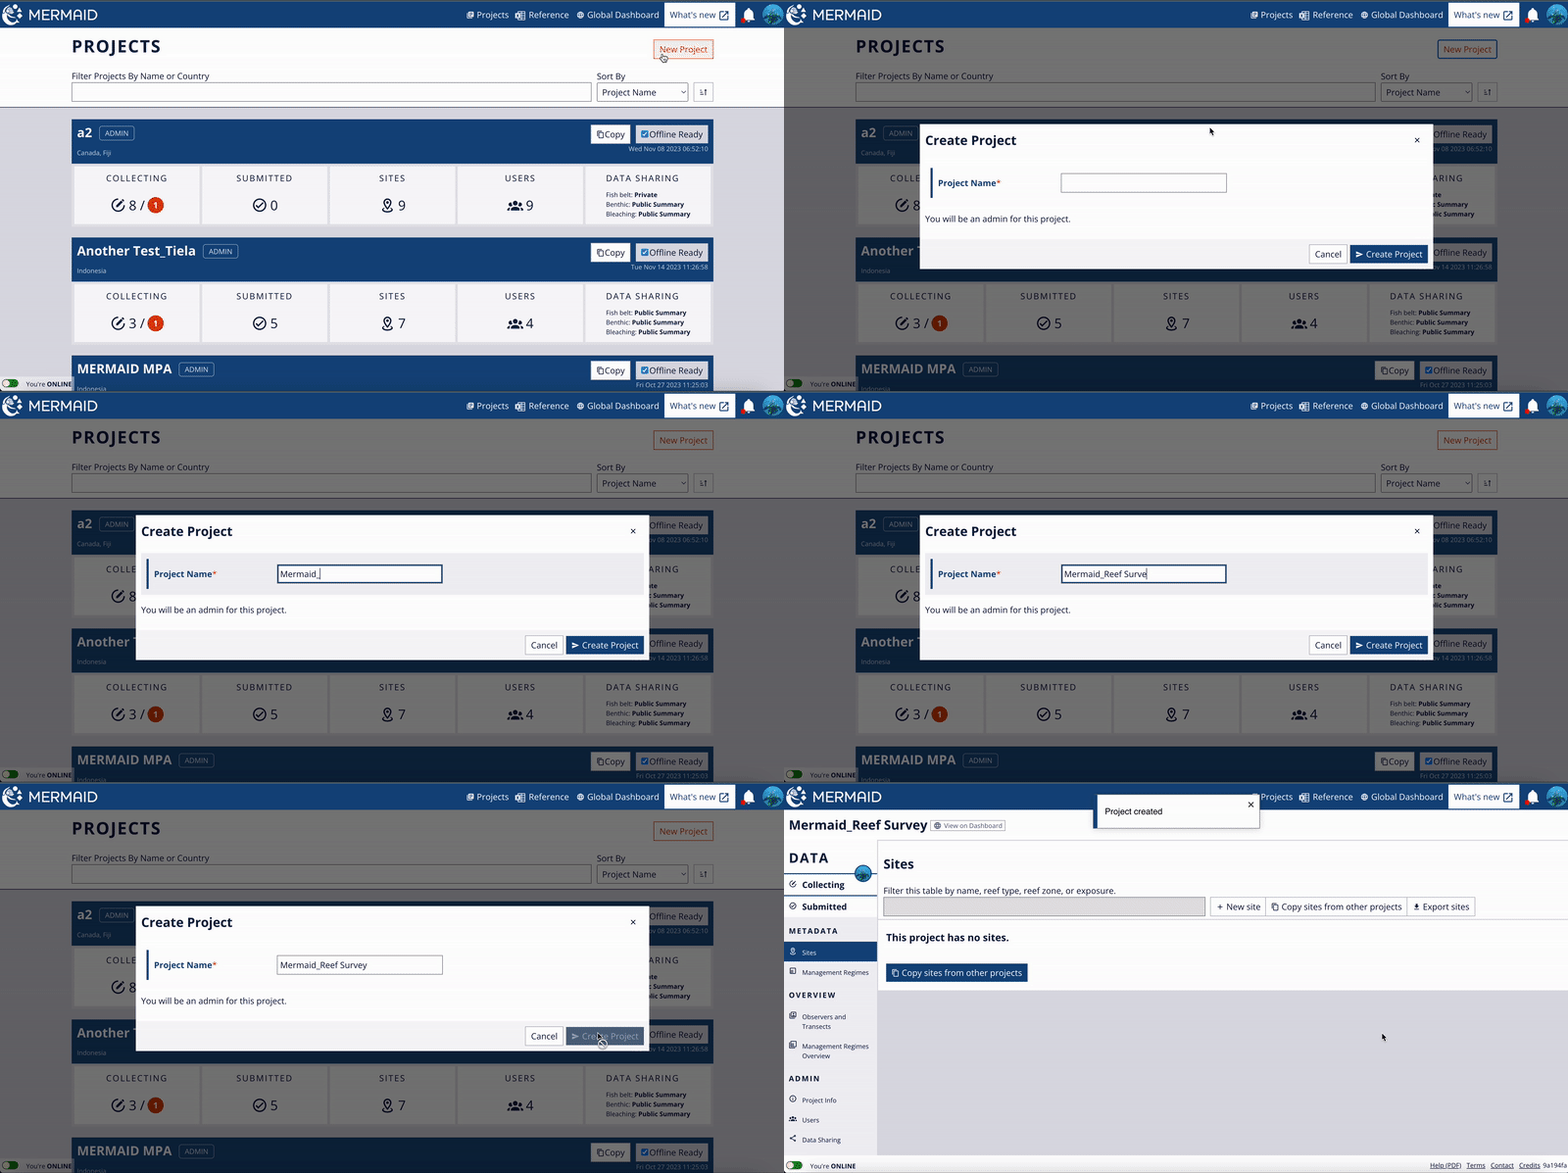
A new project can only be created while online. To create, click the red ‘New Project’ button, enter a project name, then click “Create Project” to complete your new MERMAID project. A name is required for every new project. All other information can be added using "Project Info" in the lefthand menu.
After a project is created, add users, sites, management regimes, and organization, and set data sharing policies while online.
1. Add Users:
Enter the email addresses for users involved in the project and select their roles. Users should be signed up for a MERMAID account before they can be added to a project. You can add an email that has not yet been associated with an account, but that project user's name will appear as '(pending user)' and they will not be able to access MERMAID until they associate that email with an account.
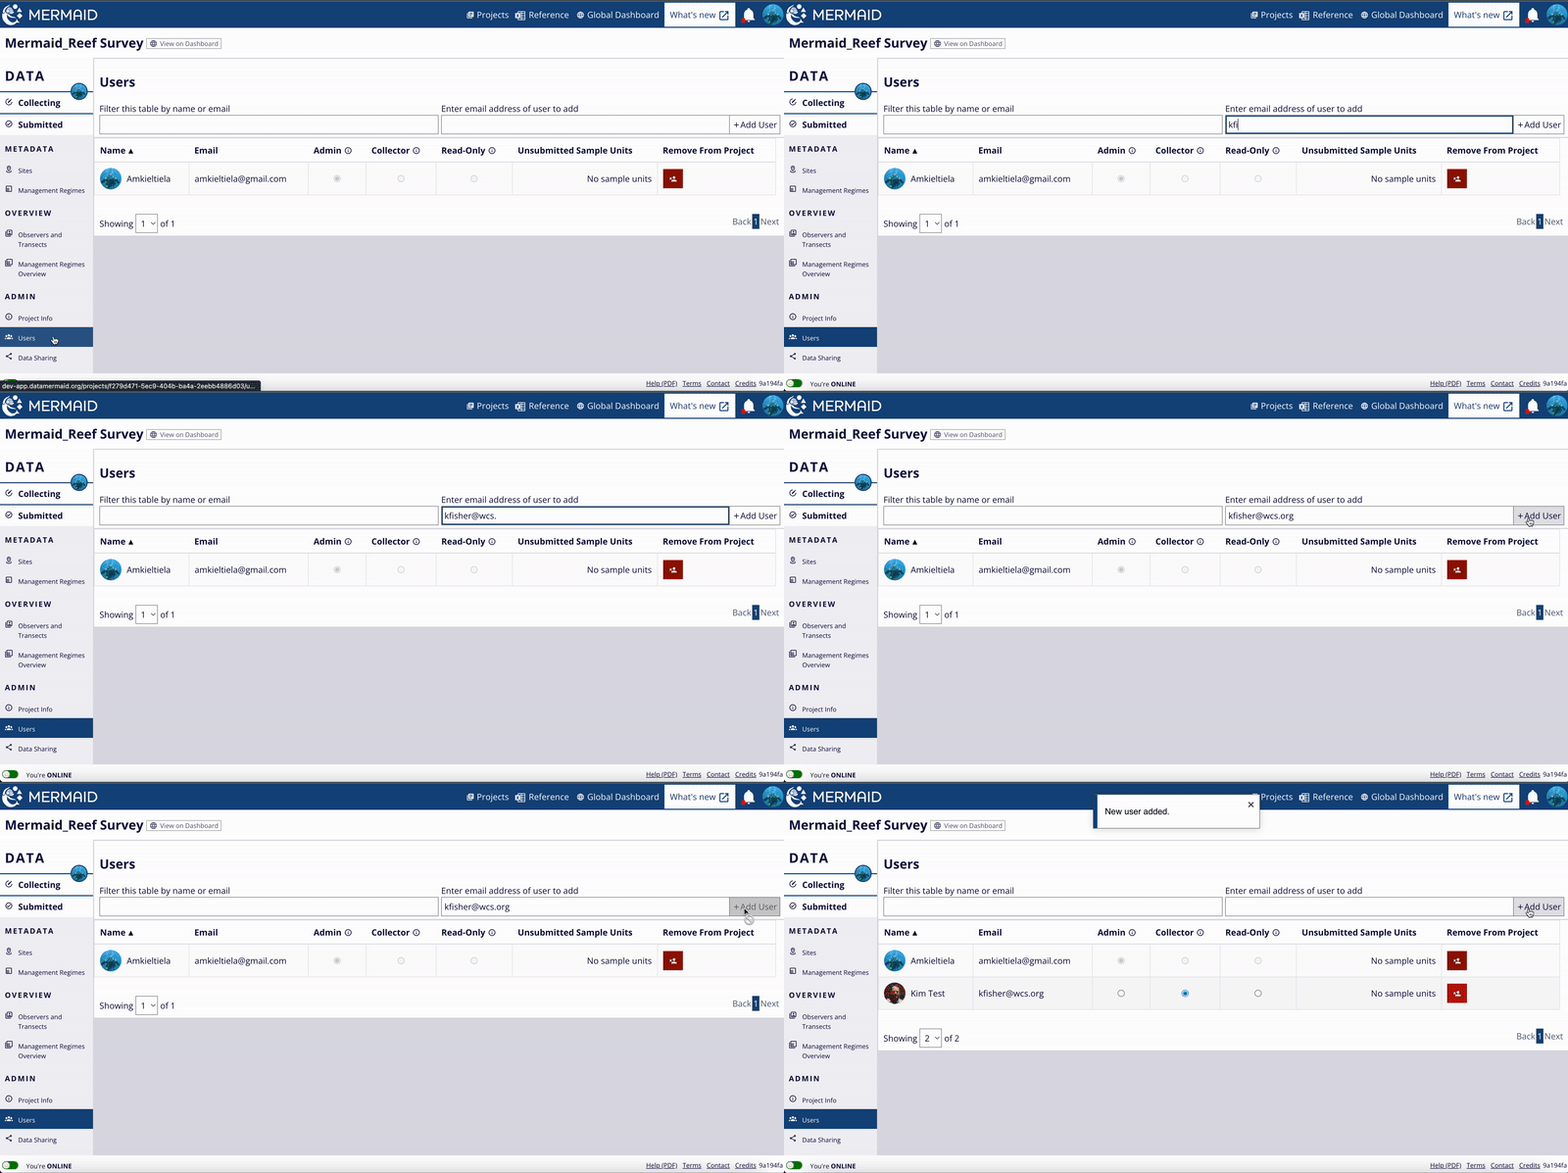
The project creator is automatically the administrator (‘admin’) of the project. Other users will default to the collector role when added and can be changed to admin or read-only by selecting the appropriate role from the available options. Additional users can be added or deleted by the administrator after a project is created.
The scope of each role is as follows:
Read-Only: user can only view, export, and analyze data in the analysis tools, but cannot collect new observations.
i.e. a project manager who is in charge of writing reports or analyses but is not collecting data in the field
Collector: user can view, export, and analyze data, and collect new observations. Once a transect is submitted, the user can no longer edit or delete observations.
i.e. a member of the project team who is tasked with collecting data
Admin: user has all Collector privileges, and can additionally change project information and data sharing, add and remove project users, transfer unsubmitted sample units between project users, and un-submit sample units for further editing.
i.e. typically one person designated as the lead of the project
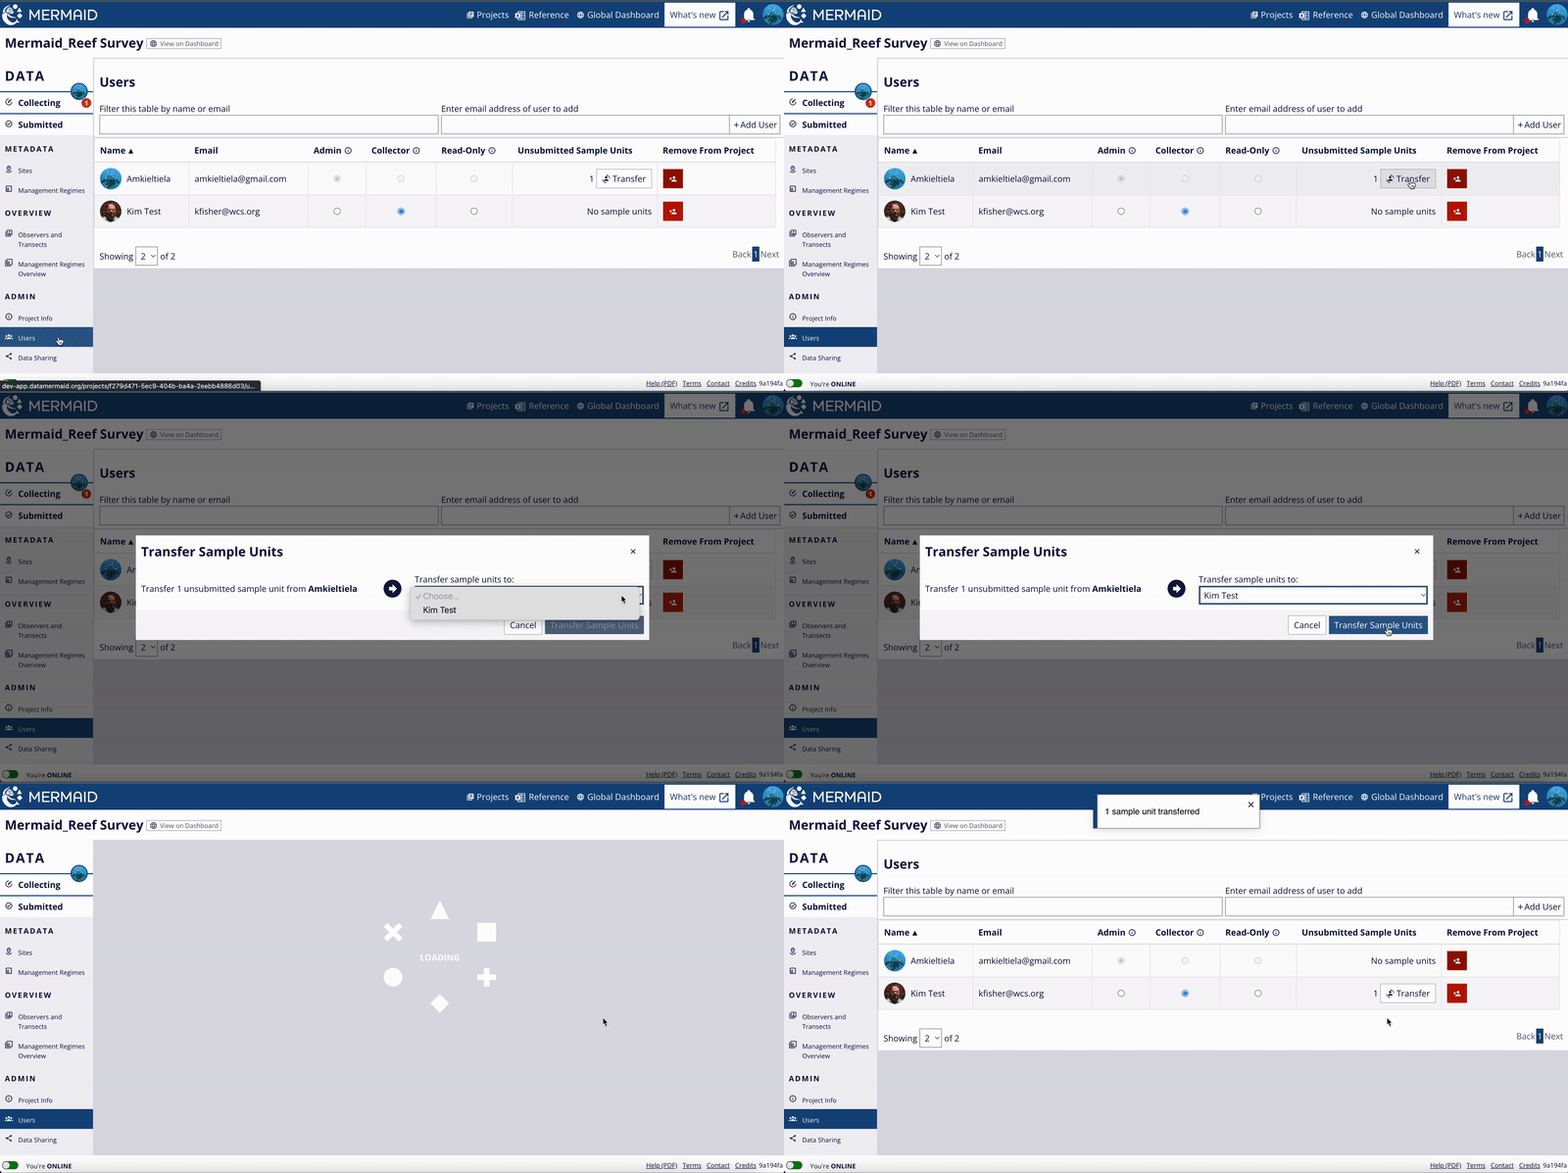
If a user must leave a project or reaches the end of their position, their data can be transferred to other users within a project. This can be done within a project through the "Users" tab. Simply select ‘Transfer’ for the user that will be removed from the project, then indicate the user from the project to whom you would like to transfer the unsubmitted sample units. Users can also be removed from a project on this page. If a user still has unsubmitted sample units on their “collecting” page, be sure to transfer records prior to removing them from the project.
2. Add Sites:
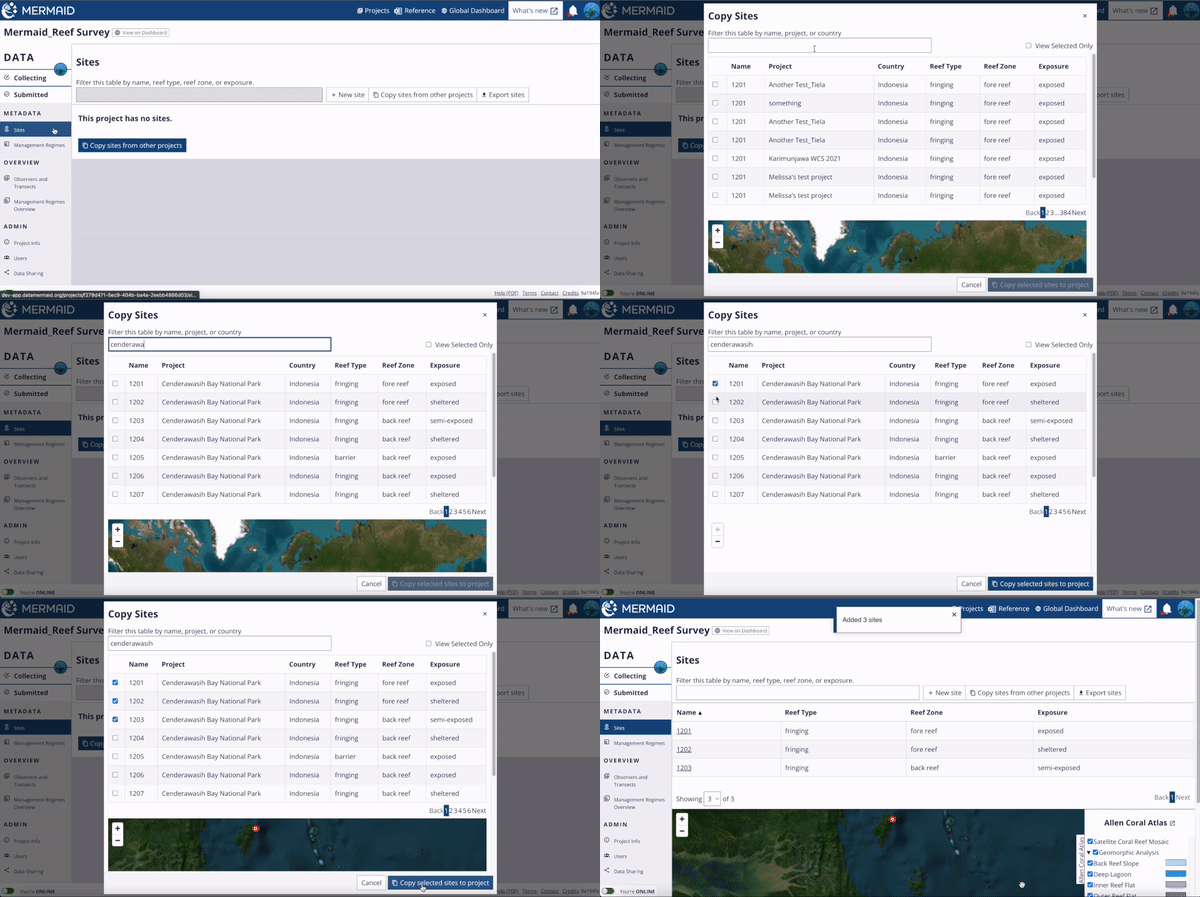
Adding sites to a project is done after the project has been created, by selecting the "Sites" item under "METADATA" in the lefthand menu within a project. Once on the sites page, there are two ways to add a site to a project:
Create a new site using the "+ New site" button at the top right of the page, fill in the details and click the 'Save' button on the top right of the page.
Choose from sites that are already in the MERMAID system using the "Copy sites from other projects" button next to the create new site button. These may be sites that you or your organization are monitoring and have used before in previous surveys. The search bar allows you to filter the list by site name, project name, or country. Click the check box next to any site you would like to add to your project, then click the “Copy selected sites to project” button at the bottom of the dialog. A map at the bottom of the dialog also displays where the site is located with a red dot.
3. Add Management Regime:
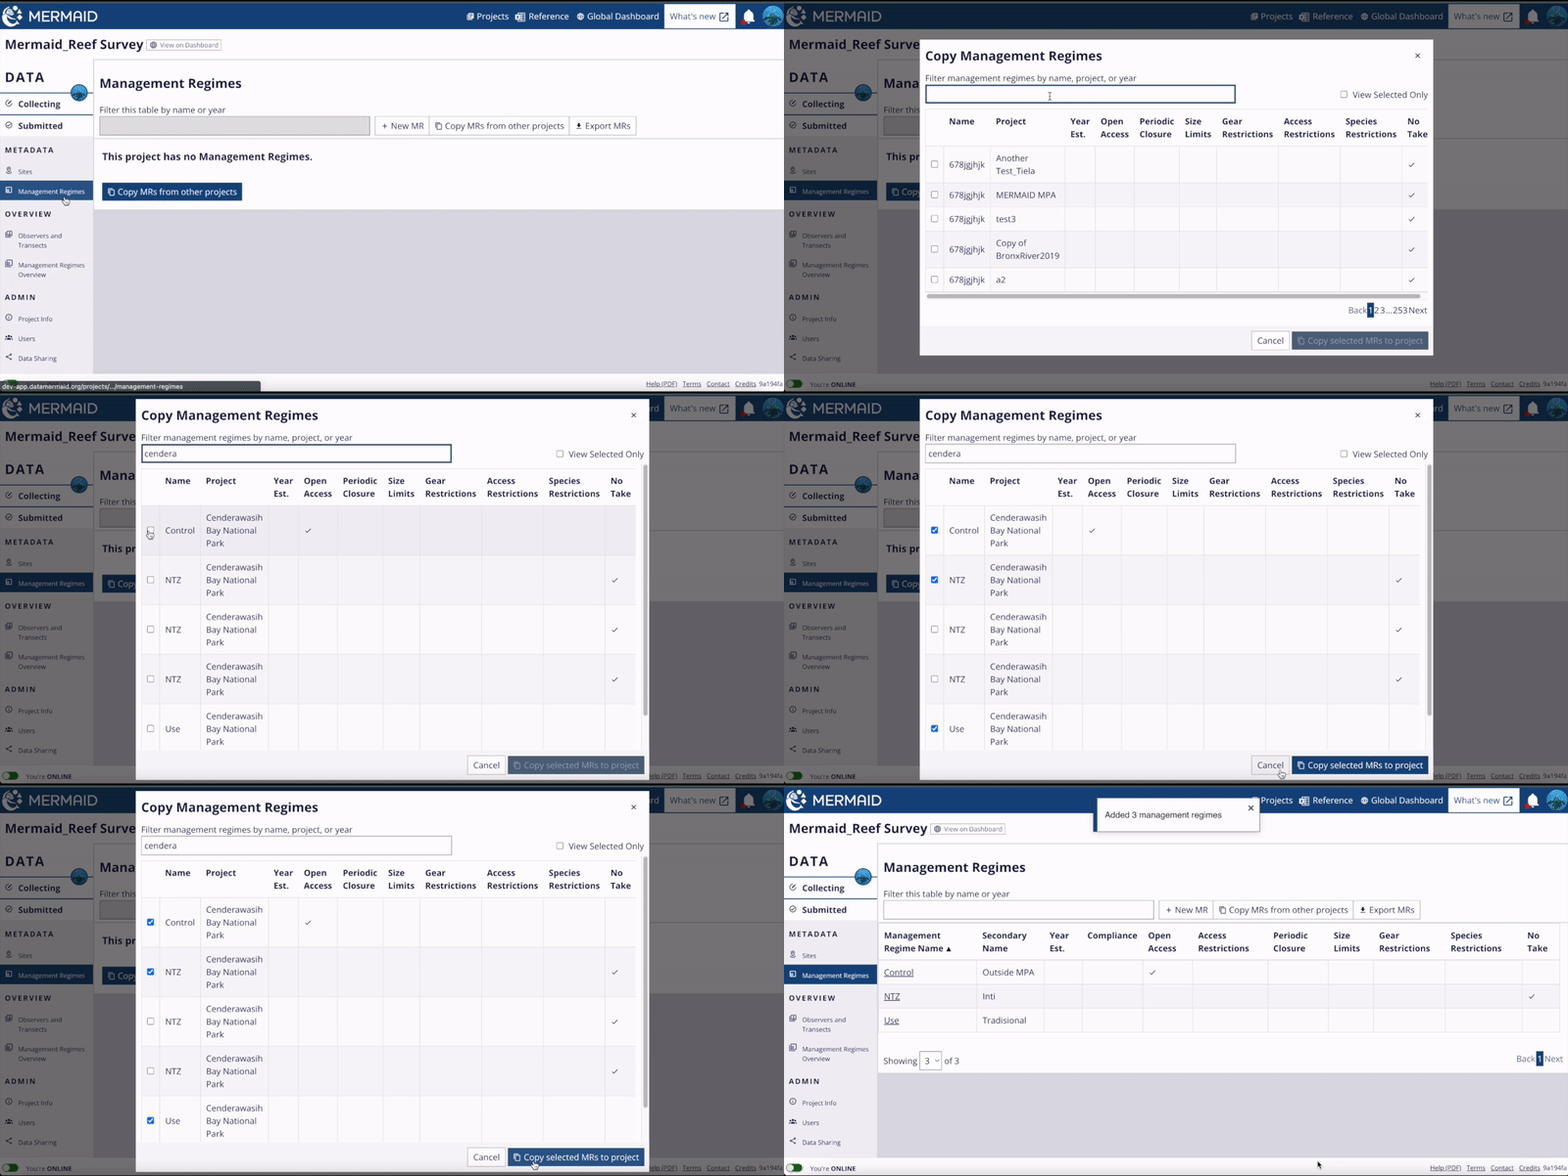
A management regime categorizes the regulations and restrictions placed on an area in which a survey site is located, on the date of the survey. These may be management regimes for sites that you or your organization are monitoring or have used in previous surveys. To add management regimes, navigate to "Management Regimes" in the lefthand menu within a project.
If you are surveying sites with a new management regime, or if your site’s management regime has changed, it must be added after creating your new project.
There are two ways to add management regimes to a project:
Create a new management regimes using the "+ New MR" button at the top right of the page, fill in all the details, and then click 'Save' on the top right of the page.
Choose from existing management regimes in the MERMAID system using "Copy MRs from other projects". You can save time by selecting and adding previous management regimes to your project here. The ‘Filter’ bar allows you to search the list by management name, project name, or year. Click the check box next to any management type you would like to add to your project, then click the “Copy selected MRs to project” button at the bottom of the dialog.
4. Add organization
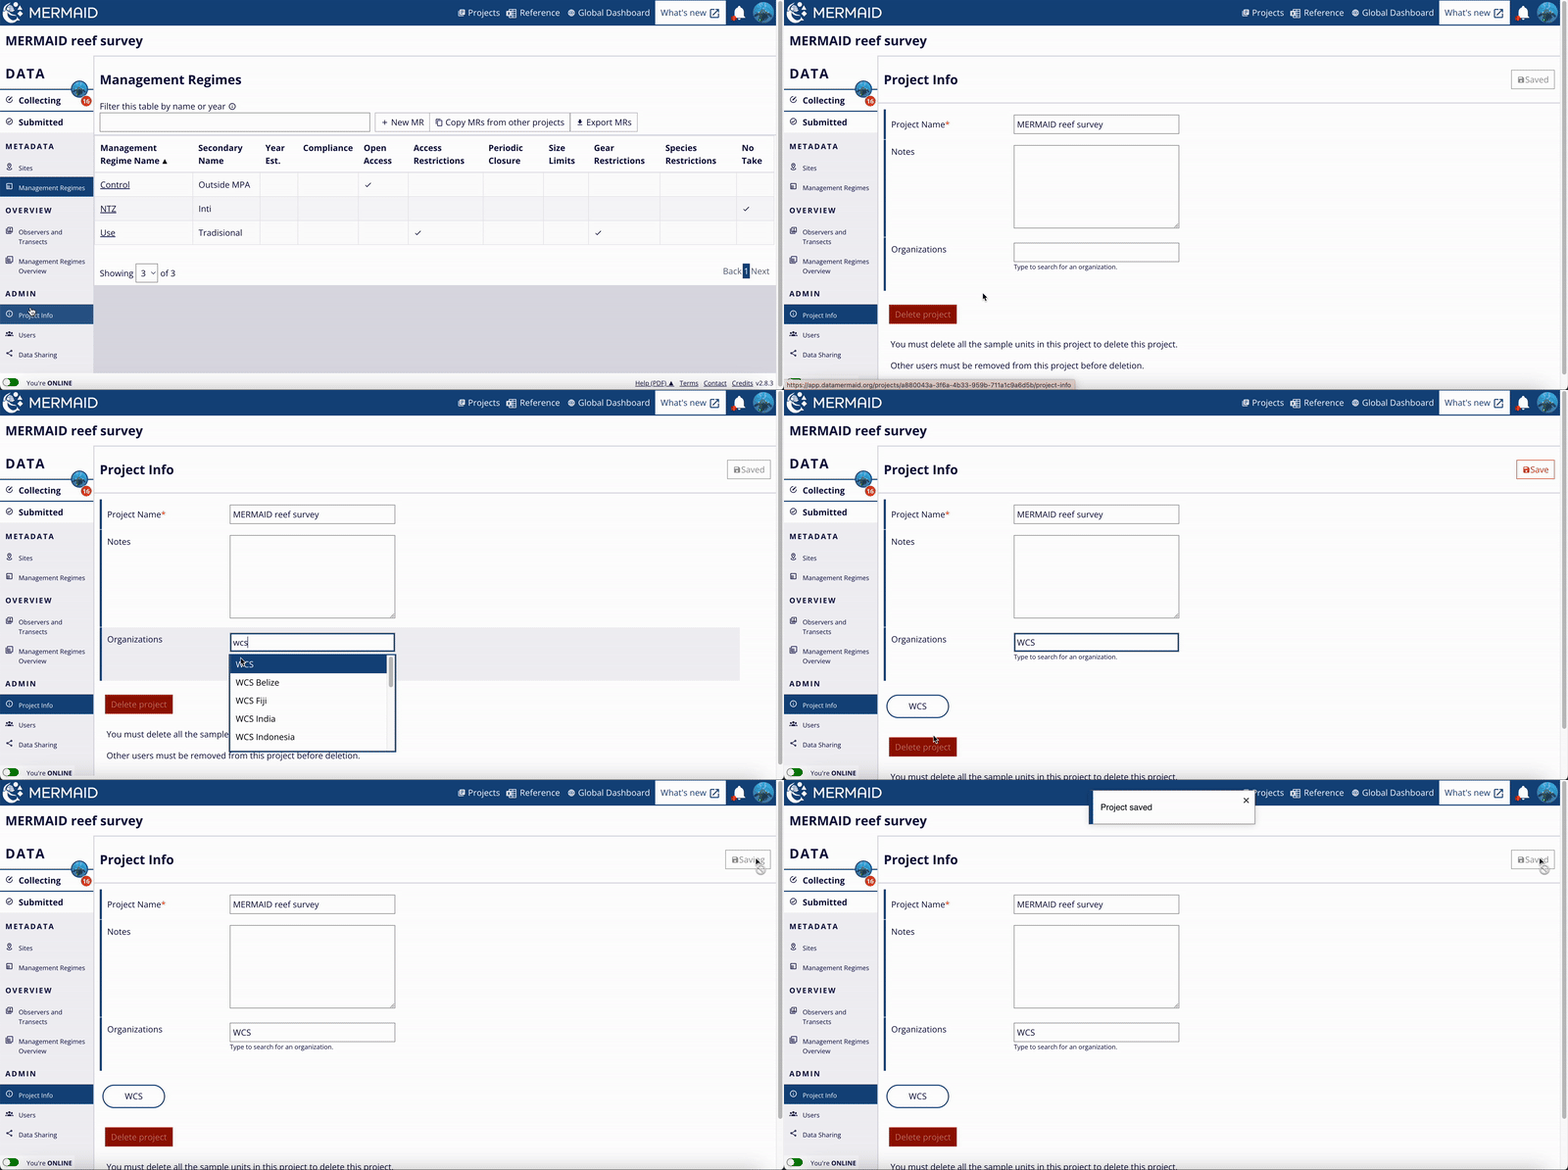
Add your organization to the project. By adding your organization, it will help you monitor your surveys easily by using the filter function on the MERMAID dashboard. To add your organization, use the "Project Info" item under "Admin" in the lefthand menu within a project. As soon as you type, MERMAID will show you a dropdown options of the available organizations for you to select. You can add more than one organization in a project. Once you're done adding organizations, click the "Save" button on the upper right to record your changes.
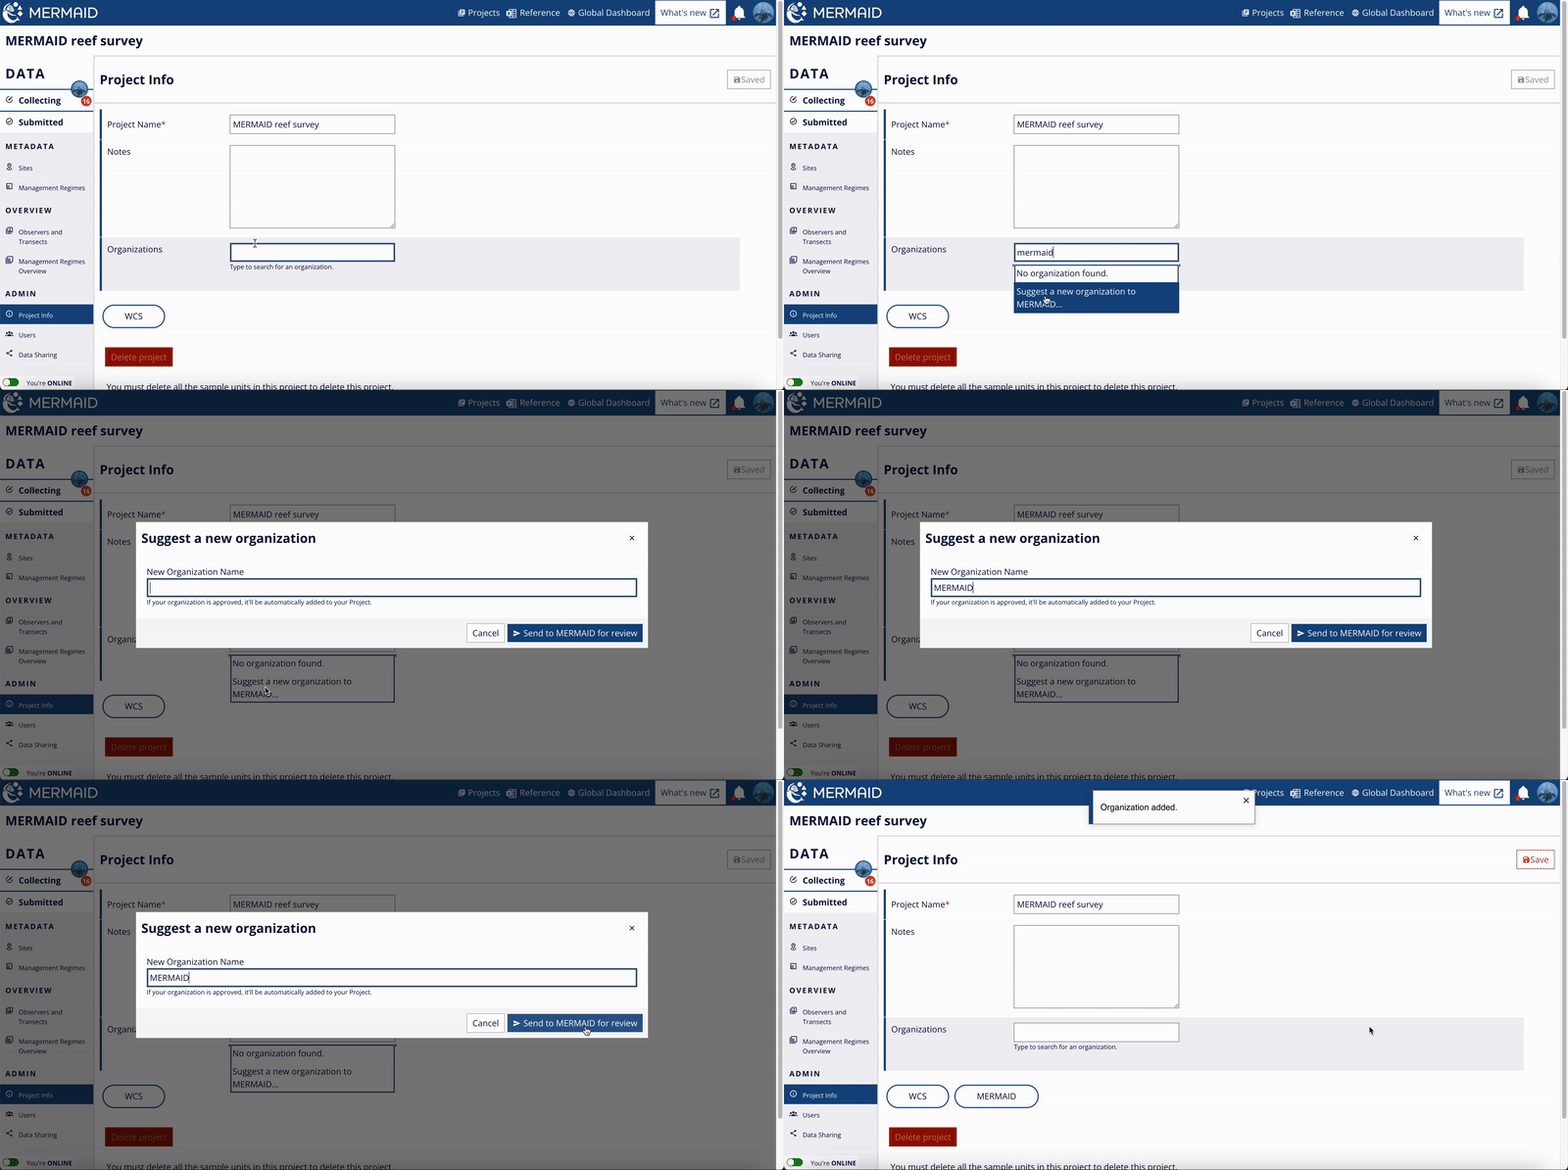
If you can't find your organization under the available options, you can suggest a new organization. To do this, type your organization name in the "Organizations" field and select "Suggest a new organization to MERMAID" option. Type again your organization name in the "New Organization Name" field and click "Send to MERMAID for review". Once your organization is accepted, it will be available in the dropdown list.
5. Data Sharing:
MERMAID is committed to working collectively as a community of researchers and reef managers to use the power of data to make faster, better decisions. Coral reef monitoring data is collected with the intent of advancing coral reef science and improving management. We recognize the large effort to collect data and your sense of ownership. While not required, we hope you choose to make your data available to fuel new discoveries and inform conservation solutions.
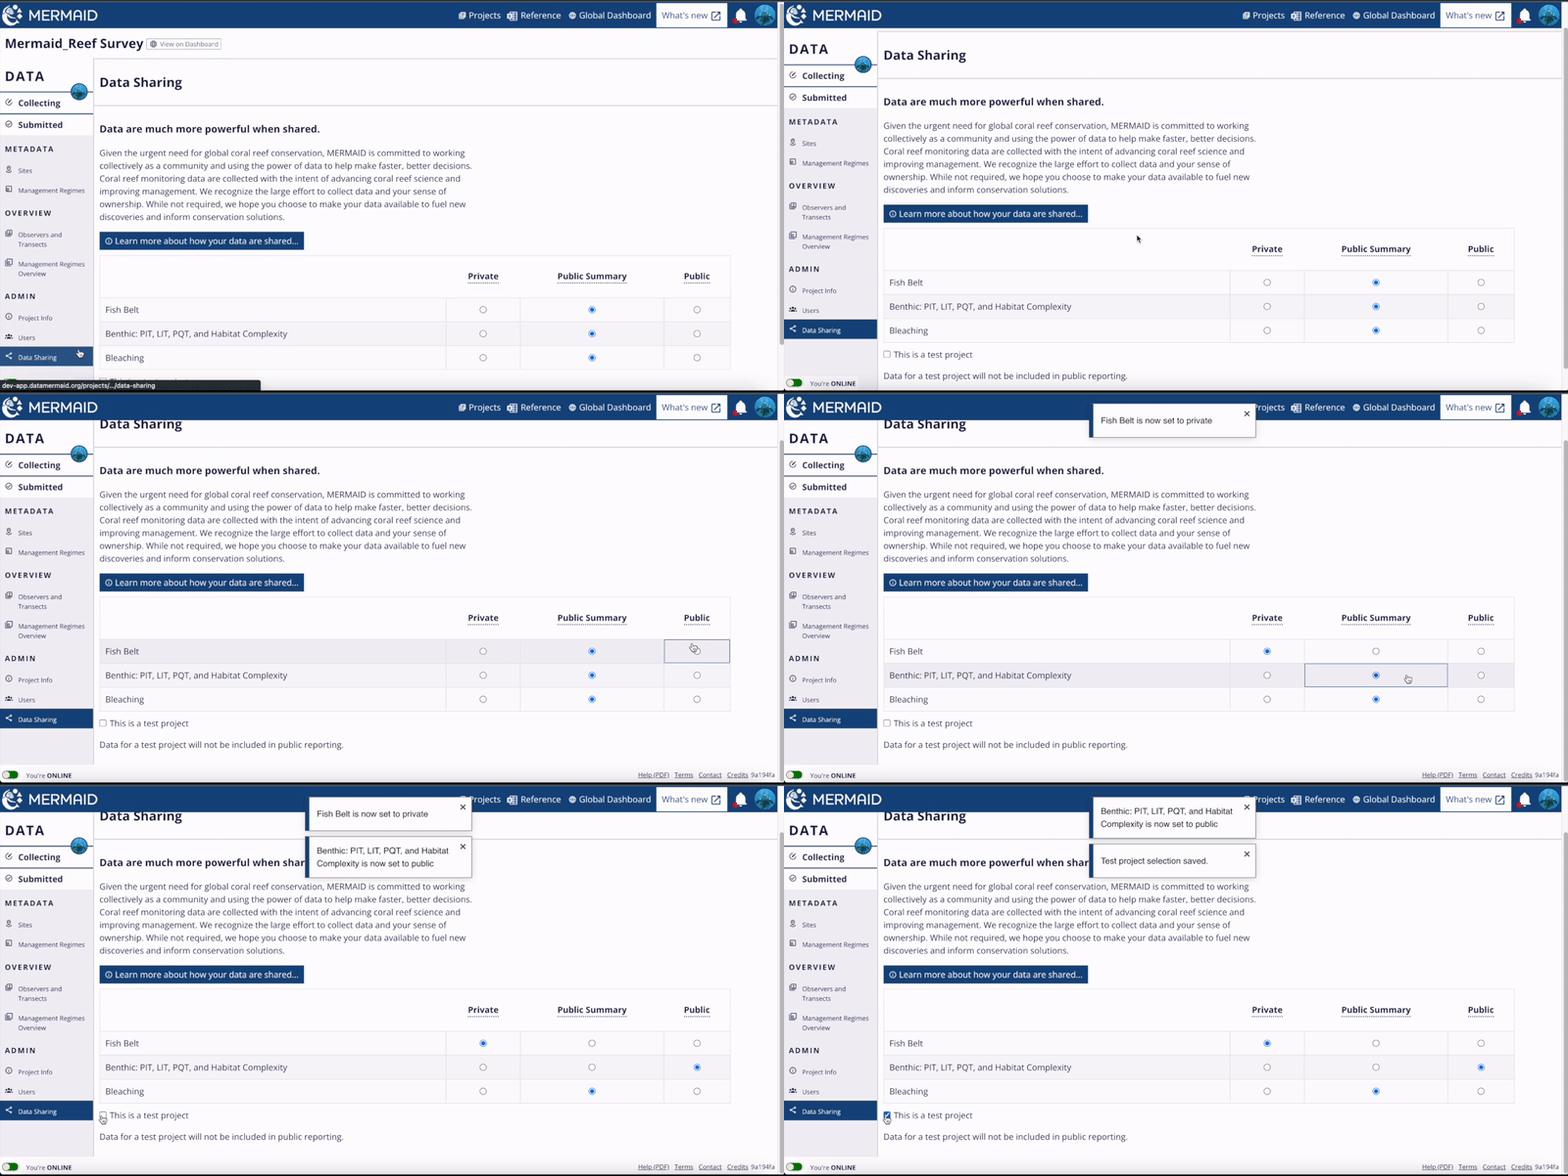
Choosing a data policy for your project determines how much of your project’s data can be shared with other users to facilitate global collaboration and understanding of coral reef health via future global dashboard features in MERMAID. It can be chosen independently for different survey methods, so that fish and benthic data can have different levels of sharing. Your data policy level can be changed at any time after creating a project.
The three policy levels are:
Public summary – Collected observations are private, but site-level summary statistics are public, along with metadata for the project, protocol, and site. This option is the default.
Public – All collected observations are public.
Private – Collected observations and site-level summary statistics are private, but metadata for project, protocol, and site, including site location and type and count of sample unit at each site, are public.
If you are creating a project to practice using MERMAID or train others, you can indicate this with the 'This is a test project' checkbox at the bottom of the page. Data added for a test project will be omitted from all public reporting.
Now your project is ready to be used!